




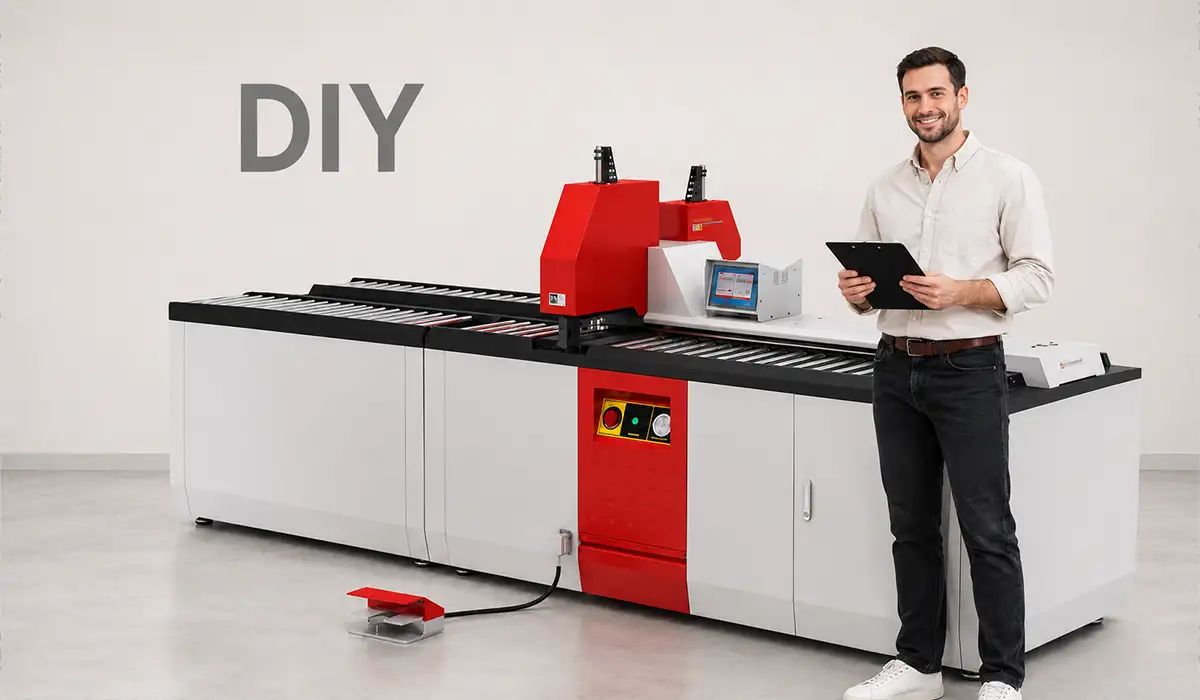





For your convenience, if you prefer listening, you can listen to the rest of this article via the audio file below.
Busbar Machine Project Introduction: Why I Started This Journey
I did not start this project as a “machine buyer.” I started it as a frustrated DIY-minded engineer who was tired of wasting time with improvised tools, inconsistent bends, and rework.
My original goal was simple: build a small, reliable workflow for busbar preparation and light metal forming work in a workshop environment. In reality, it quickly turned into a much bigger journey—part procurement, part hands-on testing, and part expensive education.
At first, I thought I only needed a busbar bender. Then I realized I also needed to understand cutting, punching, tooling compatibility, hydraulic vs manual systems, and even the boring things nobody talks about enough—floor space, shipping, dies, noise, and operator fatigue.
The funny part is that while researching busbar machines, I also got pulled into other industrial equipment categories (including a cow crush and a non-woven bag making machine) because some of my clients and contacts were comparing machine investments across different businesses. That helped me build a much better framework for evaluating industrial machine pricing in general.
So, this is the real story—my trial-and-error journey from curiosity to a practical buying decision.
If you are looking for more information about punch machine tooling, it is recommended not to miss reading this article on Busbar Processing Machine.
.
Busbar Machine Buying Plan: Defining What I Actually Needed
That gave me a messy list of results: compact hydraulic benders, full busbar processing lines, cutting stations, punch presses, and a lot of wholesale listings with unclear specifications. Prices were all over the place, and many listings looked cheap until I noticed they excluded dies, pumps, or shipping.
I stopped and wrote down my actual use case:
- Low- to medium-volume copper busbar work
- Repeatable bends for panel and switchgear assemblies
- Occasional punching and cutting
- Limited workshop space
- Budget-sensitive, but not “cheapest possible”
That changed everything.
Instead of shopping blindly, I started comparing machines by workflow:
- Measure and mark
- Cut
- Bend
- Punch
- Deburr and verify
Once I mapped the steps, I could tell the difference between a machine that looked impressive in photos and one that would actually fit my work.
For a comprehensive understanding of punching and notching operations, we highly recommend reviewing this article on punching notching machines.
Wholesale Busbar Bender Options I Shortlisted First
I first looked at wholesale busbar bender and wholesale copper busbar bender listings because I assumed I could save money buying directly.
Some were manual hydraulic units (portable and affordable), and some were semi-integrated electric-hydraulic systems. A few looked good on paper but had vague claims like “high precision” with no bend tolerance data.
I learned to ask for these details immediately:
- Max busbar width and thickness (copper/aluminum separately)
- Minimum bend radius
- Angle repeatability
- Included dies
- Pump specs (manual, electric, foot pedal)
- Tool steel grade / die hardness
- Warranty and spare parts availability
- Video of actual bending (not just marketing footage)
That last one saved me more than once.
Further exploration of Busbar Fabrication Machine can be found in the following recommended reading.
Busbar Machine Pricing: What I Learned About Real-World Cost Ranges
Before this project, I used to ask, “How much is a bending machine?”
Now I ask, “Which bending machine, with what tooling, for what material, at what duty cycle?”
Because the “price” is never just the base machine.
I saw this pattern repeatedly in busbar equipment:
- Low entry price
- Missing tooling
- Extra freight
- Commissioning not included
- Limited or no local support
So, I started tracking total landed cost, not catalog price.
If you are looking for more information about busbar cutting machine, it is recommended not to miss reading this article.
Busbar Machine Price Ranges I Encountered (Practical Buying View)
The table below reflects the ranges I personally found during my research and discussions with suppliers/distributors. These are ballpark ranges
| Machine Type | Typical Use | What Usually Raises the Price |
|---|---|---|
| Manual busbar bending machine | Small workshops, site jobs | Die sets, hydraulic pump quality, frame strength |
| Portable hydraulic busbar bending machine | Field work / flexible use | Electric pump, angle stop accessories, carrying kit |
| Bus bar cutting machine (standalone) | Dedicated cutting | Blade quality, thickness capacity, hydraulic/electric actuation |
| Busbar punching machine (standalone) | Hole making / slots | Punch/die sets, tonnage, positioning stops |
| Busbar processing machine (multi-function) | Cut + bend + punch workflow | CNC features, automation, safety guards, throughput |
| CNC bending machine (metal/general) | Repetitive bending production | Brand, controls, servo systems, tooling ecosystem |
What surprised me most was how often a “cheap” machine became expensive after adding:
- Copper-compatible dies
- Shipping and customs
- Voltage conversion / electrical modifications
- Spare punch sets
- Operator training
- Maintenance stock (seals, hoses, hydraulic oil)
My Rough Budget Chart for a Busbar Machine Purchase
I made a simple planning chart to avoid fooling myself with the base price.
Base machine price ████████████████████ 55%
Tooling & dies ████████ 20%
Shipping / customs █████ 12%
Installation / setup ███ 6%
Spares & maintenance stock ██ 4%
Training / mistakes buffer █ 3%
The “mistakes buffer” was not theoretical. I used it.
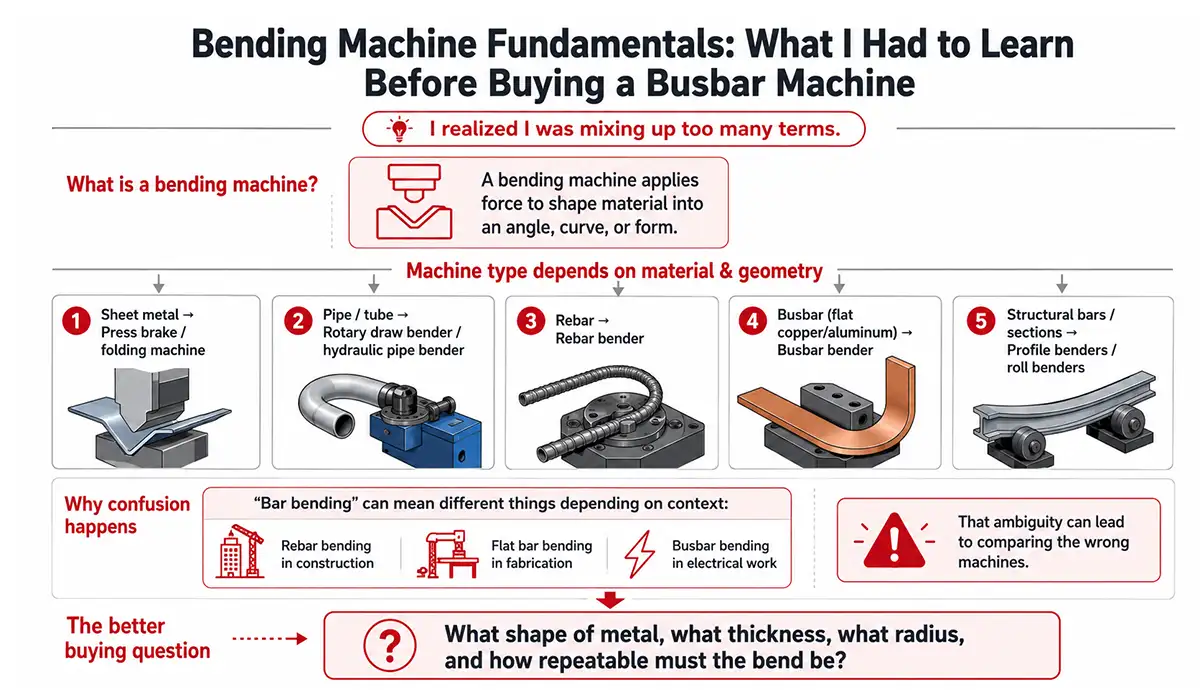
Bending Machine Fundamentals: What I Had to Learn Before Buying a Busbar Machine
I realized I was mixing up too many terms.
I kept seeing questions like:
- What is a bending machine?
- What machine is used to bend metal?
- What is bar bending?
And honestly, if you are new to this space, those questions are valid. I had practical workshop experience, but the machine categories still overlap in confusing ways.
A bending machine is simply a machine that applies force to shape material into an angle, curve, or form. But the actual machine type depends on the material and geometry:
- Sheet metal → press brake / folding machine
- Pipe/tube → rotary draw bender / hydraulic pipe bender
- Rebar → rebar bender
- Busbar (flat copper/aluminum) → busbar bender
- Structural bars/sections → profile benders / roll benders
“Bar bending” can refer to several things depending on context:
- Rebar bending in construction
- Flat bar bending in fabrication
- Busbar bending in electrical work
That ambiguity caused me to waste time comparing the wrong machines early on.
I also learned that “what machine is used to bend metal” is too broad a question for purchasing. The better question is:
What shape of metal, what thickness, what radius, and how repeatable must the bend be?
Punch Machine Basics: What Is a Punch Press and How Do Punch Machines Work?
This was the second big area I had to understand because punching and bending often go together in busbar work.
A punch press (or punch machine) uses force to drive a punch through material into a die, creating holes or shaped cutouts. In busbar fabrication, this is incredibly useful for bolt holes, slots, and mounting patterns.
The basic sequence is straightforward:
- Position the workpiece
- Align punch and die
- Apply force (manual, hydraulic, mechanical, or servo)
- Shear the material cleanly
- Retract and inspect
What I did not expect was how much the result depends on small details:
- Punch-to-die clearance
- Material hardness
- Tool wear
- Workpiece support
- Alignment discipline
My first test on a borrowed setup produced a slightly burred hole because I rushed alignment and used a worn punch. It was still usable, but it taught me a lesson: machine quality matters, but setup quality matters just as much.
Also, the term “puncher” is ambiguous. In some listings, it means a handheld hole punch tool. In others, it means a full punching machine. I always check photos and tonnage specs now.
Bending Machine Field Tests: My DIY Lessons With Copper Pipe, Stainless Pipe, Rebar, and Home Bending
Before committing to a larger machine purchase, I ran a few smaller bending exercises in my workshop to sharpen my instincts.
This part helped me a lot, because it reminded me that materials behave very differently—even when they look similar on the shelf.
I tested on scrap pieces first (which I strongly recommend).
How I Learned to Bend Copper Pipe Without Kinking
Copper pipe was my “confidence material” because it is workable, but it still punishes sloppy technique.
My first kink happened because I tried to bend too tight, too quickly, with poor support. The pipe flattened slightly and the bend looked ugly.
What improved my result:
- Using a proper tube bender sized for the pipe OD
- Marking the start point carefully
- Bending gradually instead of forcing it in one motion
- Maintaining alignment through the bend
- Practicing on short scrap lengths
I also learned that people confuse pipe and tube tools all the time. The wrong bender size can ruin a piece instantly.
How I Handled Stainless Steel Pipe, Rebar, and Pipe Bending at Home
Stainless steel pipe was much less forgiving than copper.
I tried a light-duty approach first and immediately felt the springback issue. The bend looked fine under force but relaxed more than expected after release. That taught me to account for springback, especially with harder materials.
Rebar was a different story. It bends, but consistency depends on leverage and fixture stability. For home bending, simple tools work for small jobs, but once repeatability matters, a dedicated rebar bender is worth it.
As for bending pipe at home, my rule became:
- If it is one-off and non-critical, a basic bender is fine.
- If fit-up matters, use the right bender and measure twice.
- If safety or pressure systems are involved, do not improvise.
What Type of Bender Is Used to Bend a Four-Inch RMC?
This question came up while helping someone plan conduit work.
For 4-inch RMC (rigid metal conduit), you are generally talking about heavy-duty, professional-grade bending equipment—not a small DIY handheld bender. In practice, this usually means specialized conduit bending equipment (often hydraulic/mechanical systems designed for large conduit sizes) with proper shoes and support.
That was another moment where I realized how dangerous it is to generalize “bending machine” as one category.
My Quick Material Behavior Table From Workshop Trials
| Material | My First Problem | What Fixed It | Key Lesson |
|---|---|---|---|
| Copper pipe | Kinking / flattening | Correct tube bender + gradual bend | Tool sizing matters more than force |
| Stainless steel pipe | Springback | Overbend compensation + better fixture | Harder materials need planning |
| Rebar | Inconsistent angle | Stable jig / repeatable stop | Repeatability beats brute force |
| Flat copper busbar (scrap) | Surface marks | Cleaner dies + alignment | Finish quality depends on tooling condition |
Busbar Machine Workflow Trials: Where I Made Expensive Mistakes and What I Changed
Once I had enough hands-on confidence, I visited two workshops and tested a few machines—some standalone, some multi-function.
This is where theory became an expensive reality.
In one case, I tested a compact hydraulic setup that looked perfect online. In person, I noticed three problems immediately:
- The angle stop was too crude for repeatable production work
- The frame flexed more than I liked under load
- Tool changeover took longer than expected
For a hobby user, that machine may have been acceptable. For my workflow, it would have become frustrating fast.
On another visit, I tested a heavier system (similar in concept to what brands like PAYAPRESS, ALFRA, or other industrial busbar equipment suppliers offer in this category). The difference was obvious:
- Better rigidity
- Cleaner bends
- Faster setup
- More confidence in repeated work
The price was higher, of course. But this was the first time I felt the “why” behind the cost.
The Mistake I Made With Punching Sequence
I originally planned to bend first, then punch.
That sounded logical until I realized positioning and fixturing became harder after bending certain parts. In several cases, punching before bending made alignment easier and reduced handling time. Further exploration of automatic punching and shearing workflows can be found in the following recommended reading on automatic punching shearing.
Now I decide the sequence based on geometry:
- If holes are near the bend zone, I plan carefully around deformation risk.
- If holes are far from bends, I often punch first for easier referencing.
This one change reduced my scrap rate.
The Hidden Workshop Issues Nobody Mentions in Product Pages
I wish someone had forced me to think about these earlier:
- Machine footprint with operator movement space
- Noise in a small workshop
- Hydraulic hose routing
- Power supply compatibility
- Chip/scrap management
- Die storage
- Safety guards and hand clearance
I once placed a temporary setup too close to a wall and learned the hard way that the machine’s working envelope was larger than its footprint. The machine fit. The operator did not.
Busbar Machine and Industrial Machine Pricing: What a Cow Crush Cost and a Non-Woven Bag Making Machine Taught Me
This part sounds unrelated, but it improved my buying decisions the most.
A friend in agricultural equipment asked me to help compare cow crush options (cattle restraint equipment), and another contact was evaluating a non-woven bag making machine for a packaging business.
At first, I thought, “These have nothing to do with busbars.”
But the purchasing logic was almost identical.
How Much Does a Cow Crush Cost? The Lesson Behind the Question
The price of a cow crush varies widely depending on:
- Manual vs hydraulic operation
- Galvanized vs painted finish
- Safety features
- Head gate design
- Build thickness
- Brand reputation
Sound familiar?
It was the same trap as busbar machines: low base price, high long-term risk if build quality and support are poor.
That comparison helped me become stricter with industrial machine suppliers in general:
- I now ask for serviceability, not just specs.
- I ask what breaks first.
- I ask what parts are stocked locally.
- I ask how long downtime usually lasts.
Non-Woven Bag Making Machine Features: Durability and Speed Changed My Thinking
When I helped review non-woven bag machine options, the conversation was all about speed, durability, and uptime.
That reminded me of a key truth in industrial buying:
A machine is not “expensive” because of the purchase price.
It becomes expensive when it cannot maintain output.
For those machines, the critical features included:
- Production speed (bags/min)
- Servo system quality
- Sealing consistency
- Frame rigidity
- PLC stability
- Spare parts and support response
For busbar machines, the equivalent concerns became:
- Cycles per hour
- Repeatability
- Tooling life
- Hydraulic reliability
- Ease of setup
- Local technical support
If you are looking for more information about punch machine tooling, it is recommended not to miss reading this article on punching machine tooling.
Different industry, same logic.
My Practical Industrial Machine Comparison Framework (Reused Across Categories)
| Evaluation Factor | Busbar Machine | Cow Crush | Non-Woven Bag Machine | Why It Matters |
|---|---|---|---|---|
| Build quality | Frame/dies/hydraulics | Steel thickness/welds | Frame/drive system | Durability and safety |
| Throughput | Parts/hour | Animals/hour | Bags/min | Productivity |
| Repeatability | Bend angle/hole position | Restraint consistency | Seal/cut consistency | Quality control |
| Serviceability | Hoses, seals, tooling | Hinges, gates, latches | Heaters, servo, belts | Downtime risk |
| Spare parts access | Punches, dies, seals | Pins, locking parts | Electronics, blades | Recovery speed |
| Operator safety | Guards, hand clearance | Animal + operator safety | Guards, emergency stops | Liability and trust |
| Real support | Training / response time | Field service | Technical support | Long-term ownership success |
This framework kept me from making a flashy but weak purchase.
Busbar Machine Buying Decision: What I Finally Chose and Why
After all the demos, spreadsheets, and workshop testing, I stopped chasing the cheapest listing.
I chose a mid-range busbar processing setup with solid bending capability and an upgrade path for punching/cutting tooling. It was not the lowest-cost option, but it fit my actual workflow and reduced the chances of rework.
Why I chose it:
- Good rigidity during bending
- Repeatable angle control
- Available tooling and spare parts
- Reasonable support response
- Better long-term value than a cheap standalone tool mix
I still kept one portable hydraulic bender in my plan for field flexibility and small jobs, because portability matters when the workpiece is awkward or the site is tight.
If I had to summarize the whole journey in one sentence:
I thought I was buying a busbar machine, but I was really designing a workflow.
And once I understood that, the right purchase became much clearer.
Busbar Machine Conclusion: The Real Lesson Behind Bending Machine and Punch Machine Research
This project taught me more than machine specs.
It taught me to respect process flow, operator ergonomics, tooling quality, and the difference between a demo-friendly machine and a production-friendly machine. It also reminded me of broad questions like “what is a bending machine?” or “how much is a bending machine?” are useful starting points—but bad buying questions if you stop there.
The best results came when I got specific:
- What material?
- What thickness?
- What volume?
- What tolerance?
- What support?
- What downtime can I afford?
If you are researching a wholesale busbar bender, a busbar processing machine, a bus bar cutting machine, or even unrelated industrial equipment, my advice is the same: build your evaluation around the job, not the brochure. This article serves as a valuable resource for those seeking detailed information on corner angle notching.
That one mindset shift saved me money, reduced mistakes, and gave me a setup I can actually trust.


Rate this article
Choose a rating from 1 to 5 stars.
No ratings yet