

For your convenience, if you prefer listening, you can listen to the rest of this article via the audio file below.
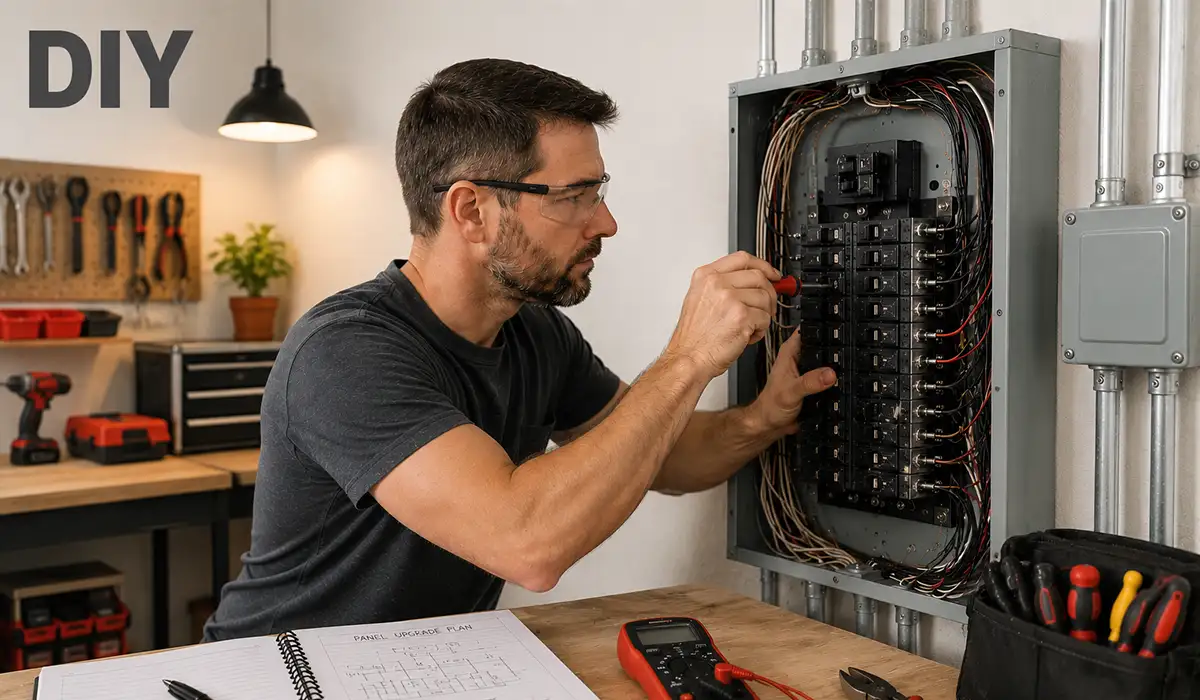
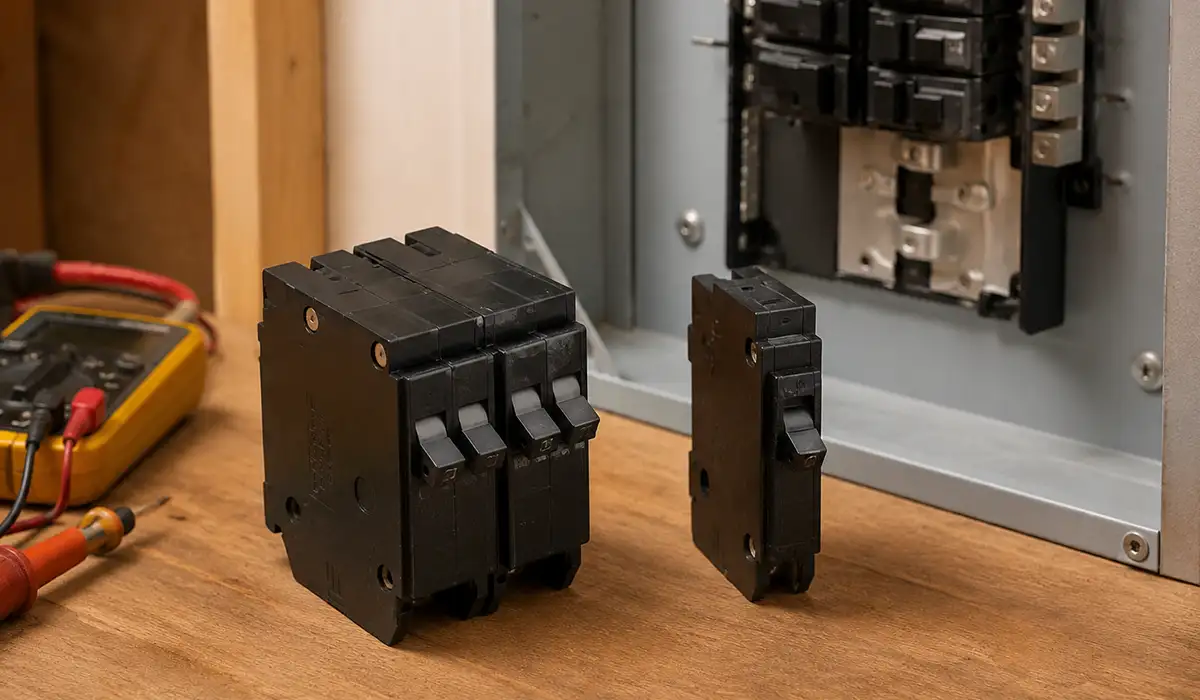
Step 1 — GE breaker compatibility: Identifying what I actually owned (before buying anything)
The project started with a simple goal: I wanted to add one new circuit for a workshop corner—lights, a couple bench outlets, maybe a small compressor later. Easy, right?
I opened the panel door and realized I’d been overconfident. The inside label had lots of clues, but I’d never really read it like a technician. I’d always treated it like a sticker you ignore.
As a result, I slowed down and treated this like a real engineering task: identify constraints first, then pick components.
If the information related to GE breakers was interesting and informative to you, researching industrial panel components can be very engaging.
What I did first (without touching(toggling) anything inside
- Read the panel door label like it was a spec sheet
- Wrote down the panel model and what breaker types it accepts
- Noted whether it was a main-breaker panel or main-lug (this mattered later… a lot)
- Took photos so I wouldn’t rely on memory at the store
Here’s the exact kind of “field notes” table I made for myself:
| Item | What I recorded | Why it mattered |
|---|---|---|
| Panel brand | GE | Compatibility depends on panel listing |
| Panel type | Main lug / main breaker (confirmed) | Adding a main breaker is not “universal” |
| Label breaker family | THQL / THQP (example) | This is the first filter for buying |
| Circuit needs | 1× 15A or 20A branch | Determines breaker rating and wire gauge |
| Special protection | AFCI/GFCI? | Breaker type may need special model |
I also checked the physical reality: some panels accept full-size breakers, some accept thin/tandem types in specific positions only. The label usually calls that out—but the panel itself confirms it.
If you are looking for more information about electrical panels, it is recommended not to miss reading this article.
Reading the panel label like a pro (my first mini “aha” moment)
The label wasn’t just legal boilerplate. It was basically saying:
- “Use these breaker types.”
- “Use tandems only here (if at all).”
- “This panel is listed with these combinations.”
That “listed with” piece is where a lot of homeowners get burned—financially or literally. I used to think “if it clips in, it’s fine.” That assumption dies quickly when you learn how bus stabs and contact tension actually matter.
If you are looking for more information about electrical panel basics, it is recommended not to miss reading this article.
My first mistake: trusting a breaker “fit” instead of verifying the listing
I’ll admit it: on day one, I Googled around and found people casually swapping brands. I almost bought something “close enough” because someone online said it worked for them.
But then I caught myself doing the classic DIY error: confusing anecdotes with engineering evidence.
So, I reset: no purchases until I could explain why it was compatible.
Step 2 — GE breaker compatibility: Decoding GE breaker IDs (THQL, THQP) and what the markings really mean
Once I accepted that breaker selection is basically part-number logic plus listing rules, my next move was to decode the GE breaker types + markings.
I kept seeing:
- THQL
- THQP
- sometimes references to “QP” breakers in general discussions
So, I treated it like reading a datasheet family tree.
Before diving into subtypes, I made myself a simple rule:
- Breaker type must match the panel label
- Amperage must match the conductor and load
- Function must match the requirement (AFCI, GFCI, etc.)
- If any of these are uncertain → stop and verify
What does THQL mean on a breaker?
In plain DIY terms: THQL is a common GE full-size breaker family used in many GE load centers. It’s often the “standard” width you picture.
What is the difference between THQL and THQP breakers?
My practical understanding after handling both (and double-checking against panel labeling):
- THQL is typically the full-size format.
- THQP is typically the thin format (often used for space-saving, tandems, or slim breakers depending on panel design).
Here’s the quick comparison table I used while shopping:
| Breaker family | Typical physical format | Common use-case | My real-world note |
|---|---|---|---|
| THQL | Full-size | Standard branch circuits | Usually the “default” in many GE panels |
| THQP | Thin / space-saving | When panel supports slim/tandem positions | Only valid where the panel label allows it |
What does the letter designation on GE circuit breakers mean?
This was the part that felt like decoding a VIN. In reality, those letters usually encode:
- family / frame style
- physical format
- sometimes application features (like combo AFCI variants, etc.)
The big takeaway from my own trial-and-error was simple:
The letters matter because they describe whether the breaker is designed to mate correctly with the panel’s bus structure and mechanical retention.
What breakers are compatible with GE THQL?
This is where people want a simple list. But the most responsible real-world answer is:
- Breakers specifically listed for that GE panel (often GE THQL family when the label says so)
- In some cases, UL Classified breakers that explicitly list your panel model—but only when the classification documentation matches your exact panel
That “exact panel” detail is where sloppy advice becomes dangerous.
What is a QP circuit breaker?
“QP” is most commonly discussed as a family associated with Siemens breakers (you’ll hear “Siemens QP”). People see “QP” and assume it’s a universal sizing code.
My experience: don’t shop by vibes and two-letter similarity. Shop by:
- panel label
- verified compatibility documentation
- exact series match
For a comprehensive understanding of circuit breaker finder, we highly recommend reviewing this article.
Step 3 — GE breaker compatibility: Compatibility vs interchangeability (and why this is where DIY goes off the rails)
This was the emotional center of the project—because it’s where I had to fight my own impatience.
I kept running into phrases like:
- “What breakers are interchangeable with GE”
- “What other breakers work with GE”
- “What brand breakers are compatible with GE”
- “compatibility / interchange”
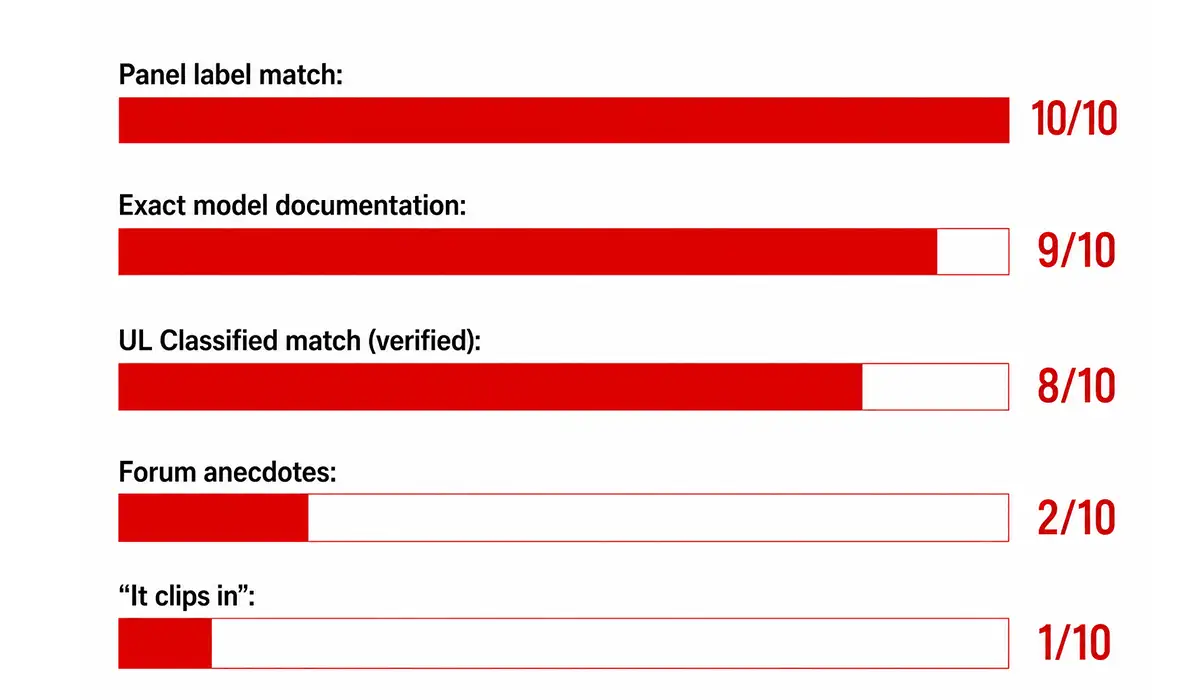
Thus, I built myself a decision ladder. If a breaker didn’t pass the ladder, I stopped.
Here’s the ladder:
| Level | Evidence | My rule |
|---|---|---|
| 1 (Best) | Panel label explicitly lists breaker family | Buy with confidence |
| 2 | Manufacturer documentation matches exact panel model | Acceptable |
| 3 | UL Classified breaker list matches exact panel | Possibly acceptable (verify hard) |
| 4 | “It fits” / “I’ve used it” anecdotes | Not acceptable |
And here’s a quick “visual” chart of how I treated confidence:
Confidence vs Evidence (DIY reality check)
This is also where I learned a subtle but important distinction:
- Compatible can mean “listed/approved for use.”
- Interchangeable gets thrown around to mean “physically fits,” which is not good enough.
What breakers are compatible with GE panels (in the real world)?
In my project, the correct answer wasn’t a brand list. It was a process:
- Identify the panel’s accepted breaker families
- Match physical format (full-size vs thin)
- Verify listing / classification for that exact panel
- Only then purchase
When I followed this, everything got easier. When I didn’t, things got expensive.
My “almost” failure: the breaker that seated… but didn’t feel right
At one point, I handled a breaker option at the store that looked like it could work mechanically. But the retention felt different, and the contact geometry didn’t inspire trust.
That “feel” isn’t proof, but it was enough to stop and verify instead of gambling.
I walked away. That one moment probably saved me from a hot spot later.
If the details you gathered about panel components were interesting and insightful, you may find diving deeper into switchgear basics equally captivating.
Step 4 — GE breaker compatibility: Who sells GE breakers, where to buy, and who actually makes them
After narrowing down correct families, I switched into sourcing mode.
And yes—this part felt like procurement. Because it is.
I checked:
- big box stores
- electrical supply houses
- online listings
But I treated sourcing like a risk problem, not just a price problem.
Here’s my sourcing matrix:
| Source type | Pros | Cons | My rule |
|---|---|---|---|
| Big box (e.g., Home Depot / Lowe’s) | Easy returns, less counterfeit risk | Limited stock | My preferred first stop |
| Electrical supply (e.g., Grainger) | Better selection, pro-grade sourcing | Sometimes pricier | Great for odd models |
| Marketplaces (e.g., Amazon / eBay) | Huge inventory | Counterfeit/used risk | Only if seller is credible + packaging checks out |
Who sells General Electric circuit breakers?
In practice: most major retailers and supply houses carry them, but availability depends on region and current stock cycles.
Who makes GE breakers?
This question matters because people assume the logo tells the whole story. In reality, branding and manufacturing arrangements can shift across product generations.
My practical rule was:
Don’t anchor on “who makes it” as much as “is it the right breaker family and properly listed for my panel.”
Since busbars play a crucial role in the production of electrical panels, obtaining more information about busbar systems can be very important and essential.
Step 5 — GE breaker compatibility: Selecting the right breaker (what breaker do I need?)
This is where the project finally felt “DIY satisfying” again—because it turned into clean engineering logic.
I asked myself:
- What load am I feeding?
- What wire gauge do I have or plan to run?
- Any code-driven requirements (AFCI/GFCI)?
- Any motor loads or startup surges?
To keep myself honest, I wrote a mini selection table:
| Circuit use | Typical breaker | Typical wire (copper) | My note |
|---|---|---|---|
| Lights / general outlets | 15A or 20A | 14 AWG (15A) / 12 AWG (20A) | Don’t “upgrade” breaker without upgrading wire |
| Workshop outlets | Often 20A | 12 AWG | Better headroom for tools |
| Dedicated tool circuit | 20A+ (depends) | Depends | Compressor/motor loads deserve planning |
| Wet area requirement | GFCI | Same as above | Protection features matters |
I also made a small checklist for breaker “features”:
- Standard thermal-magnetic
- AFCI (arc-fault)
- GFCI (ground-fault)
- Dual-function (AFCI + GFCI)
The feature choice can force you into specific breaker models within the same family—so I didn’t assume “any THQL is fine.” I matched the function too.
If you are looking for more information about arc fault breakers, it is recommended not to miss reading this article.
What type of breaker do I need? (My rule-of-thumb decision flow)
- Start with panel compatibility (family + format)
- Choose amperage based on conductor and load
- Add protection feature if required
- Confirm space (full-size vs thin positions allowed)
- Buy from a low-risk source
This flow prevented me from doing the classic DIY mistake: buying a breaker first and building logic around it later.
If the information related to industrial wiring was interesting and informative to you, researching wire selection for electrical panels can be very engaging.
Step 6 — GE breaker compatibility: Installation reality, try-and-error moments, and the day I chose a pro
This step is where I’m careful with what I share.
I’m not going to give you a “do these five steps inside your energized panel” walkthrough. That’s not responsible. But I can share what the process felt like, what I checked, and where I drew the line.
I prepped like I was going into a lab:
- Clear workspace
- Good lighting
- Labels and circuit map ready
- Torque specs noted (because loose terminations are heat factories)
And then I hit the key reality:
Even with the main off, parts of many panels can remain energized upstream depending on design and configuration.
Therefore, I limited my DIY involvement to:
- Planning, labeling, circuit mapping
- verifying breaker family and fitment without forcing anything
- having a licensed electrician handle final panel work and verification
That decision wasn’t fear—it was discipline.
How to add a main breaker to a panel (the part that looked easy online—but isn’t)
This was the biggest “internet vs reality” gap.
I originally thought: “I’ll just add a main breaker.”
Then I learned: depending on your panel, this can involve:
- a main-breaker conversion kit (panel-specific)
- replacing the load center
- adding a service disconnect upstream
- compliance with local code requirements and permitting
So instead of improvising, I did what engineers do: I defined the requirement and delegated the hazardous execution.
I told the electrician exactly what I wanted:
- A safe, code-compliant disconnecting means
- Clean labeling
- No hacky modifications
- Verified breaker compatibility
Watching a professional work was eye-opening. The confidence wasn’t bravado—it was method:
- correct torque
- correct parts
- correct verification
And the best part? My panel ended up cleaner than I could have done alone.
For a comprehensive understanding of 200 amp panels, we highly recommend reviewing this article.
Step 7 — GE breaker compatibility: What I learned from other brands (Murray, Commander, General Switch)
Once my GE portion was solved, curiosity pulled me into adjacent questions:
- what breaker is compatible with Murray
- what breakers are compatible with Commander
- what breakers are compatible with General Switch
I’m lumping these together because the lesson generalized perfectly:
Compatibility is rarely about brand loyalty—it’s about listing, labeling, and the exact load center series.
I also got why people get confused: some breaker lines share similar shapes, and older panels can blur expectations. But the solution stays consistent: read the label, verify the listing, and don’t assume interchangeability.
Here’s a summary table of the mindset that saved me:
| Panel brand | DIY temptation | Best practice |
|---|---|---|
| GE | “Lots of brands fit” | Match THQL/THQP (or label), verify listing |
| Murray | “It’s all the same as X” | Confirm exact series + approved breakers |
| Commander | “Hard to find, so substitute” | Use approved replacements only |
| General Switch | “Anything close is fine” | Treat as a listing-driven decision |
If the insights you gained from switchgear basics were intriguing and informative, exploring industrial switchboards might be of great interest to you as well.
Conclusion: What this project taught me (beyond breakers)
This DIY journey wasn’t just “buy breaker, install breaker.” It was a real lesson in how electrical safety is built from boring things: part numbers, labels, and verification.
The biggest wins came from slowing down:
- I stopped confusing fit with compatibility
- I respected the panel label like it was a spec sheet
- I treated “interchange” claims as unverified until proven
- And when the job crossed into service-equipment territory, I brought in a licensed electrician—no ego, just good judgment ✅
If you’re doing anything similar, you’ll move faster in the long run by being strict in the beginning.
If you enjoyed learning about GE breaker compatibility, investigating panel equipment might also offer a similarly engaging and informative experience.