What is a Circuit Breaker Finder ?
A circuit breaker locator is a two‑piece instrument: a transmitter and a handheld receiver. You plug the transmitter into the destination receptacle or clip it to the lighting circuit and sweep the panel with the receiver. The receiver shows you which breaker controls that outlet or light by giving the strongest signal (LED, bar graph, or tone). It works with live circuits.
How a Breaker Finder Works (Plain‑English)
The plug‑in transmitter injects a coded signal onto the energized line. Inside the panel, you move the non‑contact receiver wand down each breaker. The receiver measures signal strength and helps you narrow to the correct breaker. Because the conductors must carry the signal, the circuit needs to be energized.
Before using a breaker finder, review this simple U.S. electrical panel guide to understand the most common panel types, how main panels differ from subpanels, and why breaker layouts can vary from one installation to another. Having that baseline makes it easier to interpret receiver “hits,” avoid confusion around shared neutrals or subpanels, and label breakers faster and more accurately once you complete the power-off verification step.
Anatomy of the Tool
Transmitter types: standard NEMA 5‑15 plug, screw‑in lamp‑holder adapters for lighting circuits, and 240 V adapters for dryer/range circuits. The receiver may have sensitivity control, auto‑scan, NCV (non‑contact voltage) detection, speaker, and a small display.
Limitations & Gotchas
Shared neutrals and subpanels can confuse the readings.
• Long runs, noisy loads (switch‑mode power supplies), or parallel paths can reduce accuracy.
• AFCI/GFCI: place the transmitter on the correct LINE/LOAD side; some models include a GFCI test button—this is separate from identification accuracy.
• Lighting circuits without receptacles: use a lamp‑holder adapter or rated pigtails with care.
• 240 V circuits: only use purpose‑built adapters. Do not jury‑rig cords.
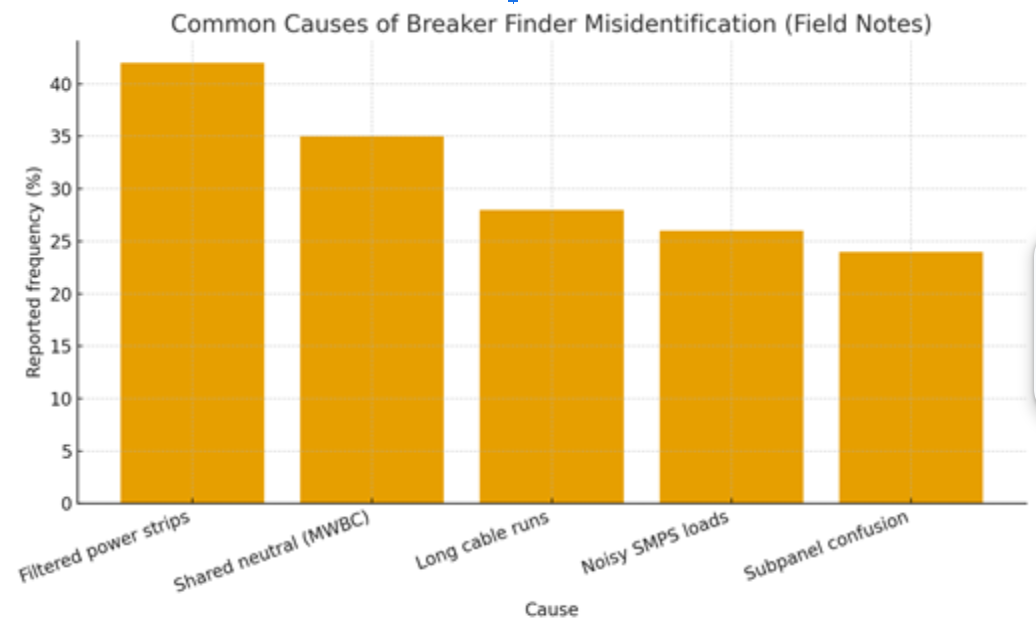
Figure: Typical reasons a breaker finder gives ambiguous results. Use sensitivity control and remove filtered loads to improve accuracy.
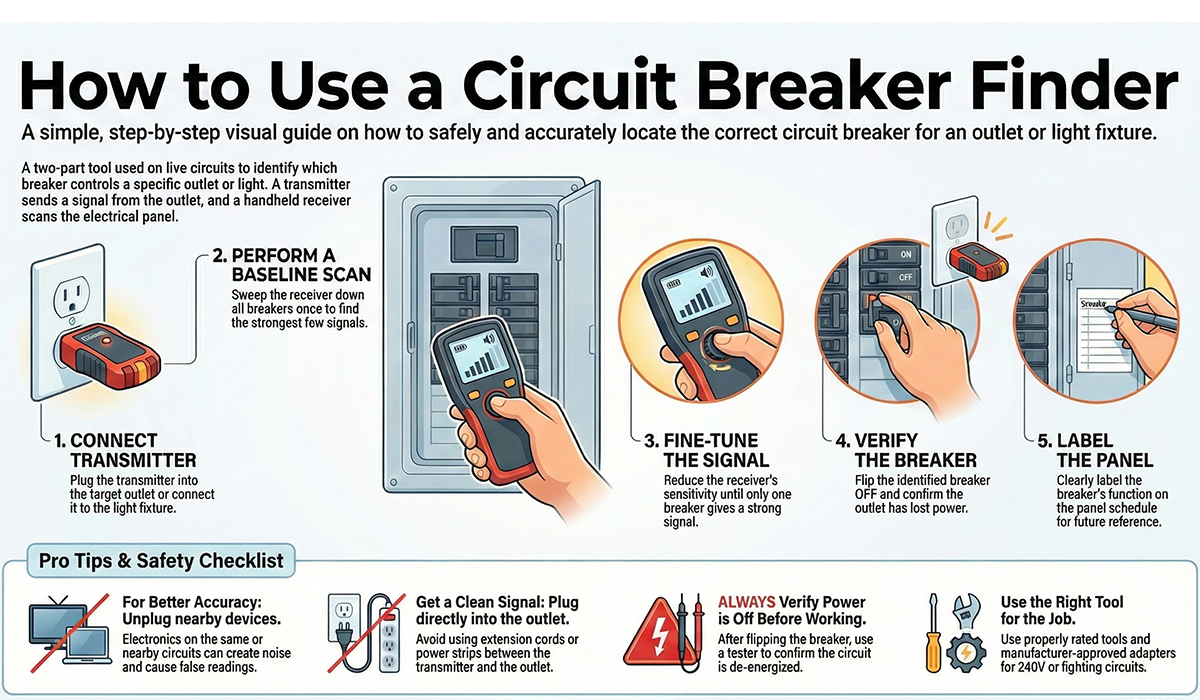
Step‑by‑Step: Using a Circuit Breaker Finder
1) Prep: If you are qualified, remove the panel cover; otherwise scan through the deadfront.
2) Connect: Plug the transmitter into the target receptacle or connect to the lamp holder (switch ON).
3) Baseline scan: Sweep the receiver down each breaker once, note the strongest few.
4) Fine tune: Reduce sensitivity so only one breaker shows a strong signal.
5) Verify: Flip that breaker OFF and confirm power is lost at the outlet/light; then label the panel.
Accuracy Tips
- Unplug local loads on the same and nearby receptacles.
• Avoid extension cords or power strips between transmitter and outlet.
• If multiple hits appear, lower sensitivity and rescan slowly.
• For subpanels, place the transmitter on a branch served by that subpanel.
• When unsure, confirm with a two‑pole tester or NCV, and always do a power‑off verification.
Safety Essentials
- Treat panels as live. Wear eye protection. Follow lockout/tagout when required.
• Do not work on energized parts unless trained and authorized.
• Use tools with the correct CAT safety rating and recognized approvals.
• Use proper 240 V and lighting adapters—no homemade cords.
• After identifying the breaker, always verify de‑energization before any work.
Breaker Finder vs. Wire Tracer vs. Toner
- Breaker Finder (live circuit tracer): fastest way to map receptacle/light to the correct breaker.
• Wire Tracer/TDR/Clamp Injectors: better for following conductors through walls or underground; often works de‑energized.
• Phone‑style Toner/Probe: for low‑voltage/telecom; not for mains circuits.
Buying Guide (What to Look For)
- Indication quality: numeric/bar‑graph plus audible tone; adjustable sensitivity.
• Compatibility: 120 V plug‑in, available 240 V and lamp‑holder adapters.
• Noise handling: auto‑calibration and good performance with shared neutrals.
• Extras: built‑in GFCI test, NCV detector, flashlight, backlit display.
• Safety & durability: proper CAT rating, listing mark, rugged probe tip, replaceable batteries.
• Fit for task: homeowner panel labeling vs. daily electrician work across many panels.
Troubleshooting: Why Isn’t It Finding the Right Breaker?
- Multiple breakers beep: reduce sensitivity, unplug electronics, try another outlet on the same circuit.
• No signal: remove filtered strips/UPS; verify the circuit is energized.
• Wrong breaker after trip: check for multi‑wire branch circuits or mislabeled/shared neutrals; confirm at the subpanel.
Quick checklist
✅ Plug transmitter directly into target outlet or lamp holder
✅ Remove nearby loads/filters; switches ON for lights
✅ Scan once fast, once slow; adjust sensitivity
✅ Verify by switching breaker OFF; relabel panel
✅ Use listed, CAT‑rated tools; de‑energize before work
Conclusion
A circuit breaker finder is a fast, practical way to match an outlet or light to the correct breaker on a live panel. It works best when you scan methodically, lower sensitivity, and remove filtered or noisy loads that cause multiple readings. Because shared neutrals and subpanels can confuse results, always confirm by switching the breaker OFF and verifying power loss. Treat panels as energized and follow proper safety and lockout/tagout practices.